Showing posts with label craftsman. Show all posts

Sunday, February 1, 2015

Toddler bedroom makeover

I have a blog?

Obviously, I've been a tad bit neglectful to my little slice of cyberspace over the past 2 1/2 months.

I've had great intentions, but lacked the follow-through.

I'm back though. I'm not promising to regularly be around, but I'm going to do my best. Between my job, family, 365 project, and a secret something I have in the works I've been a tad bit busy... Bear with me.

That  being said...


After seven months I finally got tired of looking at this room.

I decided it was time to do something about it. We had a full gallon of the same color we used in the master bedroom, and bathroom (Porpoise by Behr) hanging out unopened in the shed. I decided to make good use of this weekend and get cracking. I figured this would be a simple, no nonsense, in-and-out kind of job, but no. There are eight... yes that's right, eight walls in Lukas' bedroom. That's 8 walls worth of cutting in I had to do, which made this quick job super tedious, and slightly labor intensive. All that being said it was well worth it to have a blank slate to work with.

Without further ado...

 Obviously, I need to hang curtains, but I'm rather impressed the difference a coat of paint can make. For those of you wondering I always buy the highest quality paint I can get. I try to buy paint that has primer in it, and I can more often than not get away with one coat. If one coat can cover my obnoxious polka dots, it can probably cover just about anything else you throw its way.


This room has come a LONG way in a weekend. The trim is still in really rough shape, so that will be getting a coat of paint in the near future, but I'm not about to start that today. Trim or no trim, a certain little boy approves and that's a win in my book!


I'll try and get a 7 or 8 month update done so you guys can see the progress. I'm constantly amazed by how far this house has come. Until next time!

XOXO,
   Victoria

Friday, October 31, 2014

Guerrilla Walls

Happy Halloween!

I've been a tad bit busy lately undergoing a major change in our living room. I'm not quite ready to show the whole living room reveal mostly because I've still got half a wall to finish, but hold your horses... It's coming!

Up until a few weeks ago (yes this project has taken weeks. Give me a break. I have a two-year-old.) Our living room looked a lot like this...


A few things...

First of all the walls are wood paneling... You know how I hate popcorn ceilings? (of which we have no shortage of.) Wood paneling is right up there in the running for "most loathsome design choice."

Second, I don't know how well you can see it, but the seam in the corner is covered by corner bead... which I also despise. 

Third the "buttercream" walls were in HORRIBLE condition... Not to mention the fact that I am not really a "buttercream" kind of girl.

So something had to be done. I wanted to drywall, but decided to do that down the line around the time we install built-ins on the wall with the chimney.

Knowing that our walls days were numbered, but not wanting to live with the look of paneling anymore, I decided to camouflage the walls.

Being rather handy with spackle and a putty knife at this point in my life I went to Lowes and bought the biggest can (tub?) of Dap brand spackle I could get. I love Dap spackle for a couple of reasons. It's a nice consistency to work with, and it goes on pink and dries white so you always know when it's dry. 

I got home, armed with spackle and a determination to fill every line in the paneling to give us a smooth even surface to work with. 

After getting one coat down on one wall it became abundantly clear that I was going to have to fill every single line twice. Spackle does this things sometimes when it dries... it shrinks. (Insert sad face.) 


Post realization that this long, tedious work was about to get even more long, and tedious I sat down and ate a lot of ice cream. Then I got up, and decided I can't leave the job half finished, so I continued on.


Also I made my husband take down that horrible corner bead, which revealed a lovely gap where there should have been a seam. I filled that baby with a layer of paintable caulk, and trekked on. 

Two layers of spackle proved to be sufficient enough to get the surface flush, and not be so much that I was left with a ton of dust when I sanded it down.  

After using a fine grit sanding block I was left with a fairly flush surface which made my heart sing. I say "fairly flush" because our house is nearly 100 years old... nothing is flush.

After prepping my walls I was able to put down a gorgeous shade of blue on my walls a la Vaspar's Pacific Coast


Seriously swooning over my own space right now.

So let's get down to brass tacks, shall we? This is not an ideal solution for everyone. Anytime you have two different materials on a wall they are going to settle at different rates, which will cause cracking like plaster and drywall, or panelling and spackle. Why did I knowing this ahead of time still choose to go down this route? I am very much a visual person. I am most happy, inspired, and at ease when I am surrounded by beautiful spaces. That being said the paneling was driving me bonkers, and while the spackle was a temporary solution it was still a solution. Second we bought a nearly century old home with some piers that needed to be jacked up. We were told that this process would cause lots of cracking in our walls so keep extra paint and spackle around. I was already going to be repairing cracks anyway so the thought of cracking wasn't at all a deterrent. (In fact in our barely four months here, I've already had to repair a crack that showed up in our freshly painted bedroom. It's seriously not that big of a deal.) Third, These walls are temporary. Knowing that we would eventually drywall made choosing a $20 temporary fix that much easier.

There are definitely things to consider with choosing to camouflage your walls. I definitely wouldn't use this as a permanent solution, but it works for now, and my living room is finally a space that makes me happy... Your home should do that.

Until next time!

Hugs and kisses, and a Happy Halloween!

-Victoria

Wednesday, October 15, 2014

Cabinet reveal- Annie Sloan Chalk Paint Makeover

Those of you follow me on Facebook or Instagram have already been privy to sneak peeks here and there, but the rest of the world has yet to see the splendor that is our new kitchen.

To put it mildly I am thrilled. For a little bit of money, and a whole lotta sweat equity I was able to completely transform my kitchen.
So I won’t delay any longer…


It’s so good.

This is just phase 1. Phase 2 will involve new counters and a new farmhouse sink, but I’m trying to focus on the fact that a home is not a sprint it is a marathon… Either way I’m thrilled to have my kitchen back. The cabinet reno was making me fat, literally. I think I gained 7lbs during the month I worked on the cabinets from not being able to cook and eating crap, but I digress. It’s green juice and salmon for a while…

So how did we get here? I’ll tell you. To start we pulled the cabinet doors off, and built up the builder grade cabinets with molding. You can read about that here.


I knew I’d be working with Annie Sloan Chalk paint for several reasons. Number one being I did not want to have to sand down my cabinets with a two-year old in the house. The beauty of chalk paint is prep is really not needed. The second reason was aesthetic. I love love LOVE traditional finishes, and Annie Sloan Chalk paint has a gorgeous buttery finish that makes my heart flutter. It’s not matte, and definitely not gloss. It’s like the most perfect satiny finish you have ever laid eyes on. The wax finish is perfect for a rambunctious toddler. If my son scratches the finish I don’t have to strip it down and redo it like I would with a poly. I literally can fill the ding, and buff it out. I’m not entirely sure why people stopped using wax finishes, but I’m bringing wax back.

If you live in Northwest Arkansas the ladies of Red Hill Home were immensely helpful with helping me narrow down my chalk paint choices, and helping with finishes. They helped me narrow down a color that covered well, and gave helpful tips when it came to finishing applications. Not only do they carry Annie Sloan Chalk Paint, but they also carry Miss Mustard Seed Milk Paint and offer workshops on both products.

I decided to go with Old Ochre after seeing a finished piece at Red Hill that read more cream than beige. I was assured that Old Ochre would cover in two or three coats whereas Old White would take more along the lines of three or four. Less Work? Yes please!

After filling the old hardware holes, sanding them flush, and giving them a light scrub with soap and water it was time to paint.

I went with thin coats and lightly sanded between coats to really give a smooth, buttery finish. You can see the difference between one and two coats was pretty substantial.


After painting I was able to put on a thick coat of clear wax, with the wax brush by Annie Sloan. You don’t have to use the wax brush. I actually already owned the wax brush that I used on other projects. It is pricy, but it gets in every little nook and cranny. It really is a great tool to work with. After applying the wax, I buffed it out with an old t-shirt and let it dry. I then mixed some of the dark wax with the clear wax to create an antique finish. I applied the mixture predominately in the nooks and crannies where the cabinets would naturally age over time. After it was applied I used my old t-shirt to buff it out again. If you are working with the dark wax you want to be pretty sparing with it. A very little bit goes a long way, and too much can create a dirty looking finish, not a pretty aged look.
Once the wax dried and I was happy with the finish I installed the hardware and hung those babies up.


I can’t even believe what an immense difference painting the cabinets has made.
The kitchen feels SO much bigger, and we are thrilled! It’s really insane to me that we’ve only been here for 3 ½ months! It’s so vastly different from the house we started with. This little bungalow is really shaping up to be home.

Until next time!

XOXO,

Victoria

Monday, July 28, 2014

One month

Hey y'all!

I can't even believe it's been a month since we moved in. How did that even happen?! Time flies when you're turning a house into a home!

In honor of our first month in this home, I thought I'd give you guys a brief "where are we now" tour.

To start off the front room pretty much looks the same as last time you saw it...


This room has seen the biggest transformation this month. Every paintable surface has been painted. Popcorn has been scraped. Lighting has been updated. This room was a lot of work, but worth all the sweat.

Next we have Lukas' bedroom. We haven't done anything to this room other than move furniture in.


 We have to frame out a wall to create a hall and make this room a private bedroom, rather than a weird walk through room lacking major function. When we're done it will look like this...


Moving on...

The master bedroom has had a pretty major makeover this past month... 

It went from this:


To this:


 I scraped that hideous wallpaper off, spackled the ever-loving hell out of those (plaster) walls, painted the walls (Porpoise by Behr), changed out the lighting, and updated all the outlets, covers, switches. There is still a ton to be done in this room, but progress has been made.

The bathroom lost some friends... Specifically an octopus and a dolphin (mural). 

We painted the bathroom the same color as the bedroom, because I had it on hand, and I couldn't stand those stupid murals anymore. 


We also changed out the hardware on the sink, and that's been about it. This bathroom will get a gut job at some point. The previous homeowners thought laminate wood flooring was a good idea in a bathroom... We are going to be tiling... Specifically, basketweave tiling.. Kinda like this bit of amazing...


Swooning...

The living room has just been another case of moving our stuff in...


We need to paint... Scratch that. We need to take down paneling, then Sheetrock, then paint. I'm dreaming of a sexy, moody space for this room. Somewhere I can snuggle up with a latte, and read a book. These spaces are kind of where I think I'm heading...


I LOVE them... So much.

The kitchen looks pretty much the same except it's been cleaned to high heaven. Every square inch of that kitchen has been bleached. It was DISGUSTING. 


A few minor changes have been made. The cabinet that was above our broken hood was raised to make room for the microwave vent hood. I also took out this weird connector piece in the cabinets over the sink... It was blocking off sunlight and made no sense at all.

The dining room is also another case of "we just moved our stuff in."


I lied. We took out the ceiling fan, and put in a chandelier. Why people put fans over tables is beyond me? I don't want my food getting cold any faster... Thanks.

When we get the laundry moved out to the sunroom that table and chairs will go out with it. I'm heading towards a space similar to this one:


I got some china that has also served as inspiration for the new dining space... I'm super excited.

Well... That's pretty much all that's been done in our month here. It feels like a lot, and yet it doesn't... Probably because we still have so much more to do...

Until next time!

XOXO,
Victoria

Thursday, July 17, 2014

Office romance


I'm in love. With the other half of the playroom.

The front room (still not really sure what to call it seeing as how it has multiple functions) has a whole other side you have yet to see.

It still started out as the same tragic, periwinkle travesty you saw before, so I'll spare you the reminder...

It's now a cozy space for my husband and I to work from, all while keeping an eye on our rambunctious toddler.

Ladies and gentlemen, I present to you...


The office.

Obviously, the same work that was done to the playroom side was done to the office as well.


I love all the details in this room.


And I think every office needs a sexy navy blue velvet chair, with nailhead details, no?

Overall, I'm super happy with the way this space has come together. I plan on hanging boxwood wreaths with burlap ribbon in all four windows, but other than that I'm hanging up my design hat in this room, and calling it good until we decide to sheetrock, and put in board and batten, but there are so many more pressing projects before that happens and this space is comfortable right now.


I think Aspen would agree...

XOXO,

Victoria


Wednesday, July 16, 2014

Playroom shenanigans...

When we last spoke I believe the front room (I'm not sure what we're calling it yet) looked a little something like this...


Stunning, right?


"Let's put an armoir right in front of the front door... because that's totally logical."

...Well with a wave of my magic wand it now looks like this...


and by "wave of my magic wand" I mean hours upon back-breaking hours of work...

Let's break it down a bit. Shall we?

You see that ceiling? Do you see how there is no longer any popcorn on it? Do you see the (3) fresh coat(s) of paint? That is the worst job in the world. I wouldn't wish that on my worst enemy. I thought I was prepared to take down popcorn... I wasn't. It is terrible. It gets everywhere, and that is even with an insane amount of visqueen. I seriously visqueened so much it would make Dexter do a double take, and I still got popcorn everywhere. Not only that, I rocked a serious tyvek suit (with the hood- I'm bringing sexy back) safety glasses, and a respirator... And I used the scraper with the trashbag attached to "catch" it (a giant con if you ask me)... Still pulled popcorn out of my hair. Which is why all other ceilings in this house will either get a ceiling treatment (tin, beadboard, etc.) or I will bring in professionals for the ceilings, because I am not EVER doing that again. End of discussion.

We painted the trim white. I know it's a cardinal sin to paint wood trim, but this was in awful condition due to the SIX dogs living here prior to us. This room was originally the front porch that was enclosed, insulated, and tied in to central heat/air. The trim work in here was not original to the house, making the decision to paint it that much easier. 

We painted the walls Palisades Gray by Valspar. I really like the subtle gray. When we were painting my husband said it looked like "white on white on white" and he didn't understand why I needed to tape off for the same color. It wasn't until it dried that he could see the color variances. I was then rewarded with a big, fat "I should have never doubted your vision." Wiser words were never spoken...

We changed out the ceiling pendant too. The pendant before was reminiscant of an old Tiffany's lamp that looked better suited to a cigar lounge that serves expensive bourbon, rather than my two-year old's play area. I wanted something light and airy, and something that would look good with an Edison bulb, and lo and behold I saw this baby and fell in love. My brother came over and hooked it up for me, along with a chandelier in our bedroom. I love, love, love it! I'm a firm believer that lighting is the jewelry of a room... and every room needs a little jewelry...


This room is such a far cry from where it started. It is happy, and bright, and whimsical, and it's my favorite place to be...


I am in love, with every last detail!

I'm not sure if we'll be doing anything more in here for a while. Eventually we are going to try to match the original flooring throughout the home, and I would love to replace the painted paneling with sheetrock, and put in board and batten or shiplap, but that's a little ways down the line... Any ideas? I'd love to hear some input...

Also, I'm kind of stumped in the window treatment department... I love all the natural light, and don't want to cut it off... Maybe sheers? Nothing? Help!

Thanks for stopping by...

                                                           XOXO,
                                                                  Victoria


Tuesday, July 15, 2014

The good, the bad, and the really, really ugly.

So I guess a good place to start is at the beginning...

We bought a house.

I wish I could say that this is one of those amazing stories where the happy family walks up to their beautiful, clean house, keys in hand and it instantly feels like home, but we are not those people, and this is not that story. 

We bought a charming little 1926 Craftsman (originally) bungalow three blocks from the heart of downtown Fayetteville, Arkansas on June 27th, 2014. While loaded with character, it was A) filthy, and B) filled with questionable choices. (aesthetic and structural) Anytime we looked at the home the seller had to be there, and when we walked in the front door we were greeted by a terrible smell. (Think mildewy laundry meets wet dog) 


The house was on the market for around 6 months, which is unheard of in downtown Fayetteville. Homes here are selling in under a week. Easy. If you stick around, you'll find out why...


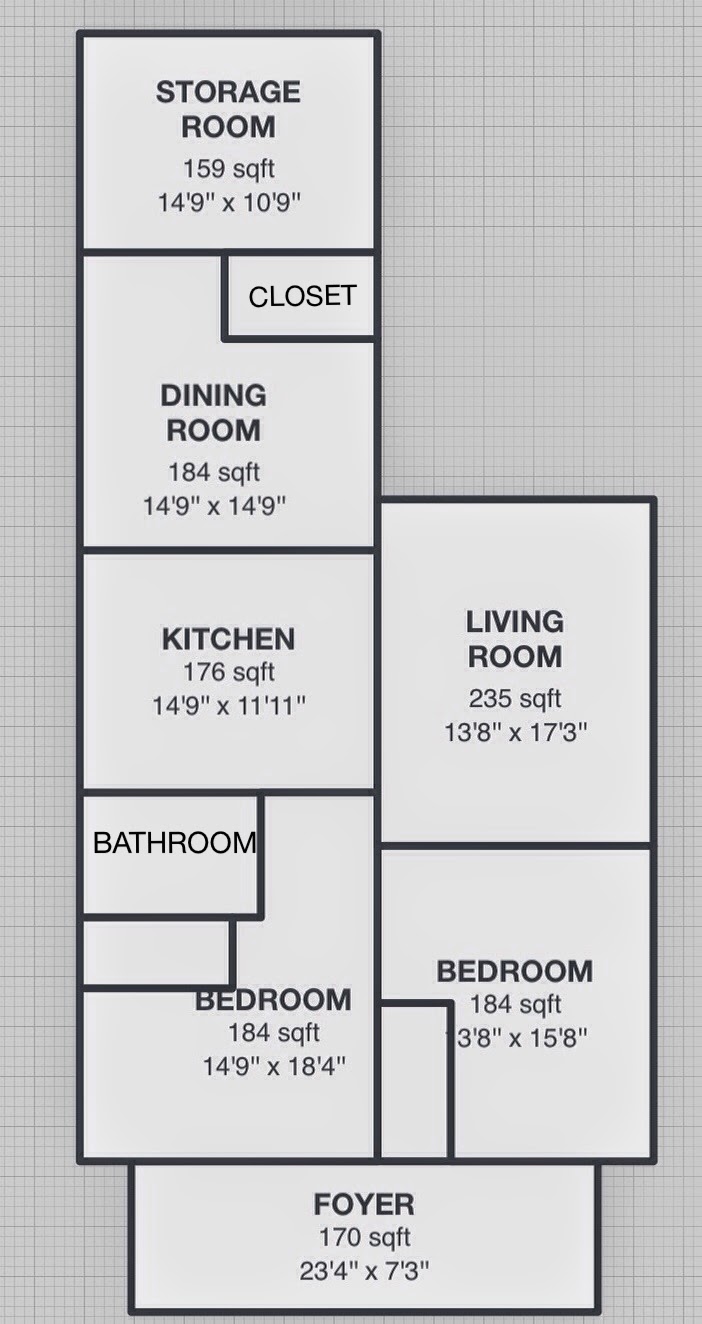
So this house has a SUPER awkward layout. It was marketed as a three bedroom home... it was glaringly obvious after walking through the front door that this home was NOT a three bedroom home. I'm not even sure I am comfortable calling it a two bedroom house at the moment. The second bedroom is a walk through bedroom right now. We have plans to build a wall and create a hallway leading to the second bedroom.

The "third bedroom" is actually the Foyer, which has become my husband's office/ our son's playroom. It is currently my favorite room in the house... Probably because it is the closest to being "done" for now; however, when we started, this room was terrible... 


The periwinkle walls really did it for me... Also, the design is incredible... where can I get that bedspread?! And the popcorn ceiling- so amazing! It came with complimentary cobwebs...

Okay, so obviously I'm not crazy about the previous homeowners hoarding decor... Moving on.

The second bedroom is really spectacular. 

I particularly like the fact that you have to walk through 2 "bedrooms" to get from the front door to the common areas. This room will be our son's bedroom. We plan on putting up a wall with a pocket door in the near future, as well as a bunch of built-ins for storage. Something like this...


The master was incredible! Truly a work of art...


I know it's hard to tell beneath all the CRAP in this house, but there are 9" baseboards in there, nearly 7' windows, and original hardwood.

Are you still here? Because I know this is a LOT to take in... I know you probably think I am insane, but there is a mountain of potential here... I promise.

On to the bathroom...


I know what you're thinking... why don't you have a sweet octupus and dolphin mural in your bathroom? It's a one of a kind piece. Sorry. Snooze you lose! 

Redeeming features include: clawfoot tub, skylight, pedestal sink... 

Moving on...

The kitchen:


"That's not so bad," you say... Well you would be WRONG. Those "stonelike" counters are fuschia formica, covered in a sticky counter treatment. The glass tile backsplash is crooked, completely wrong for the character of the home and they ran out so they used something completely different under the vent. The vent hood doesn't work, the cabinets are falling off the hinges... I could keep going on. Should I keep going?

Redeeming features: skylight, refrigerator conveyed.

The living room sold the house for us. (that statement is actually not dripping in sarcasm)

There was an exposed brick chimney, stained glass window, 9" baseboards, a vaulted ceiling... So much charm... also, once again, so much crappy taste.


I'm trying to think of nice things to say about this, but I am coming up blank...

The dining room is oh so good... it's also the laundry room... there are plans to move the washer and dryer ASAP.


Last, but certainly not least is the sunroom. The sunroom seems to be where they let their six dogs hang out on a regular basis. It reeks still and that is after two solid weeks of letting it air out. We are going to be hosing everything down with bleach and replacing the flooring with the ceramic tile that looks like hardwood. The washer and dryer will be going out here, along with built in bench seating for storage. 


Most of you are probably scratching your heads right now wondering what on earth we got ourselves into... I promise you, it's going to be okay. We're going to find the good in here sooner or later. Stick around, kick your feet up, and grab a glass of sweet tea- the fun's just startin' sugarplum!

                                             XOXO,
                                                      Victoria